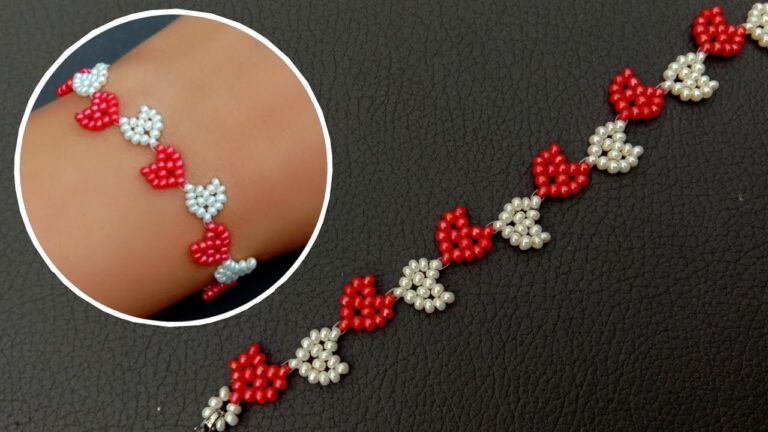
What You’ll Need:
– 3 colors of embroidery floss
– Scissors
– 1 large bead for each bracelet
– 28 small beads for each bracelet (7 of each color)
Instructions:
1. Cut three 18 inch pieces of embroidery floss, one of each color. Fold the floss in half to find the center and tie a knot at the fold to create a loop.
2. Separate the strands of floss so you have 6 total strands.
Take the strand on the far left and cross it over the middle strand. Now take the strand on the far right and cross it over the new middle strand (which used to be the strand on the far left). Keep crossing alternate outside strands over to the middle until you reach your large bead.
Add this bead by threading all 6 strands through it, then pull snugly againstthe bead so that it sits in the center of your braid.
3 – 5: Continue braiding, adding 7 small beads of each color as you go along.
- Gather your materials
- You will need some beads, string, and scissors
- Cut a piece of string that is long enough to wrap around your wrist several times with some extra to spare
- String the beads onto the string in the pattern or design of your choice
- Once all of the beads are on the string, tie the ends of the string together to form a bracelet
- To make a braid, divide the bracelet into three sections and begin braiding them together like you would hair
How to Make Braided Bracelets With Letter Beads
Making braided bracelets with letter beads is a fun and easy way to add a personal touch to your jewelry collection. All you need are some basic crafting supplies and a little bit of patience to create these beautiful bracelets.
To get started, gather your supplies.
You will need some thin cord or thread,letter beads, and a needle. Cut two pieces of cord or thread that are about 18 inches long each. Thread one piece through the needle and string on your beads in the order that you want them.
Once all of the beads are strung on, tie the two ends of the cord together in a knot.
Now it’s time to braid! Take the three strands of cord or thread and begin braiding them together tightly.
When you reach the end of the braid, tie off the bracelet with another knot and trim any excess cord. Repeat this process to make as many bracelets as you like!
Friendship Bracelet With Beads Pattern
If you’re looking for a fun and easy friendship bracelet pattern, this one is perfect! It uses just a few simple knots to create a beautiful design with beads. You can use any colors you like, but we think this combination of blue and white looks pretty stunning.
This bracelet pattern is worked with two strands of thread. To start, make a slip knot about 10 inches from the end of one strand. Then thread on six seed beads (or however many you want in your final bracelet).
Make another slip knot about 10 inches from the end of the other strand. Now you should have two strands of thread, each with three beads at the center.
Cross the two threads over each other and tie them together once, making sure that the bead in the center of each strand stays at the top.
Then take the left strand and go over the right strand, under it, and back up through the loop created (like you would tie a shoelace). Pull tight so that both loops are close to the same size.
Now repeat this step going in the opposite direction.
Take the right strand and go over the left strand, under it, and back up throught he loop created. Again, pull tight so that both loops are close to equal in size. You’ve now completed one “knot.”
Continue making knots until your bracelet is as long as you’d like it to be! Finish off by tying a knot at each end and trimming away any excess thread.
Braided Bracelet With Letter Beads
What could be more fun than creating your own personalized bracelet? With this Braided Bracelet with Letter Beads tutorial, you can add some sparkle and personality to an ordinary bracelet. This project is perfect for beginners, as it only requires a few supplies and basic jewelry-making skills.
And best of all, it’s totally customizable! So gather up your letter beads and let’s get started!
To make this bracelet, you will need:
-Letter beads ( spelling out a name, short word or phrase)
-Thread – we used black thread for contrast, but you can use any color that coordinates with your beads
-Scissors
-Tape measure or ruler
First, cut a length of thread that will comfortably wrap around your wrist several times. Add a knot at one end, leaving about 2 inches of tail.
This will be used to secure the other end of the bracelet once it’s complete. Next, string on your first letter bead. Continue adding beads until you’ve reached your desired length.
Once all the beads are in place, tie off the end with a knot and trim any excess thread. You’re now ready to wear your new bracelet!
How to Make Beaded Bracelets
Making beaded bracelets is a fun and easy way to show your personality and style. There are endless possibilities when it comes to bead choices, colors, and patterns. You can make bracelets for yourself or as gifts for friends and family.
Here’s a quick guide on how to make beaded bracelets.
First, gather your supplies. You’ll need beads, wire, pliers, and clasps.
Decide on the size of bracelet you want to make and cut the wire accordingly. Leave about an inch of extra wire at each end so you can attach the clasp later. String your beads onto the wire using one of your pliers.
If you’re making a patterned bracelet, be sure to keep track of the order of your beads as you string them on. Once all your beads are in place, use your other plier to twist the two ends of wire together until they’re secure. Attach a clasp to each end by looping the wire around it several times and twisting it closed.
Trim any excess wire and enjoy your new bracelet!
Diy Macrame Bracelet With Beads
Macrame is a form of textile-making using knotting rather than weaving or knitting. The word macrame comes from the French word mécran, meaning “frame.” Macrame is believed to have originated in 13th-century Arabia, and was later adopted by Portuguese sailors who used it to decorate the handles of their knives.
It became popular in Europe during the Renaissance. By the Victorian era, macrame was used as trimming for clothing and home decor items such as curtains, tablecloths, and doilies.
Today, macrame is enjoying a revival as a popular craft among DIYers.
Macrame can be used to create a variety of items such as wall hangings, plant hangers, jewelry, and more. In this tutorial, we’ll show you how to make your own macrame bracelet with beads.
This project is beginner-friendly and can be completed in about an hour.
You’ll need some basic supplies including: cotton cord (we like 3mm or 4mm thickness), beads (we used 6mm glass beads), scissors, tape measure or ruler, and optional: bead stopper (to keep beads from sliding off the end of the cord) .
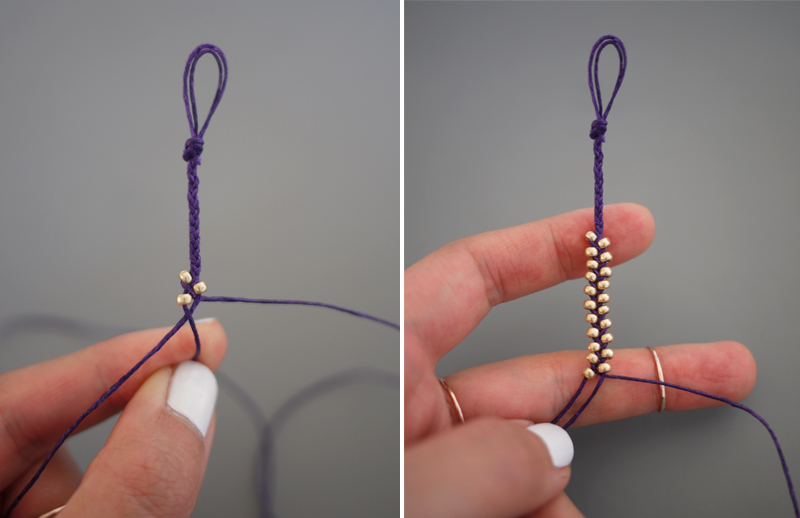
First, cut two pieces of cord measuring 18 inches each. Fold each piece in half and use one strand from each side to tie an overhand knot at the center point .
This will create a loop on each side of the center knot . Next , take one loop and make a forward knot around the other loop . Then tighten both loops by pulling on the cords .
Repeat this step until you’ve reached your desired length (we made ours about 7 inches long).
To add beads , thread them onto one side of the cord before making your next forward knot . Make sure to leave enough space between knots so that the beads can lay flat against the bracelet .
When you reach your desired length , finish off by tying an overhand knot on each side , trimming any excess cord , and adding a drop of glue for extra security . And that’s it!
Credit: honestlywtf.com
How to Make a Braided Bracelet With Beads?
Making a beaded bracelet is a fun and easy way to show your personality. You can use any type of beads you like, as well as any colors or patterns. The sky’s the limit when it comes to designing your own beaded bracelet!
Here’s how to make one:
1) Gather your supplies. You’ll need beads, wire, pliers, and clasps.
Make sure to get beads that are all the same size, so they’ll fit on the wire easily.
2) Cut a length of wire that will wrap around your wrist comfortably with a little bit of extra (you can always trim it later). Use the pliers to make a small loop at one end of the wire.
This will be where you attach the clasp later.
3) String on the beads in whatever pattern you like. If you want a more secure bracelet, put a dab of glue on each bead before stringing it onto the wire.
Just be careful not to get any glue on the parts of the wire that will need to go through the loops later.
4) Once all of your beads are strung on, use the pliers to make another small loop at the other end of the wire. Attach one half of the clasp here.
5) To finish, thread both ends of the wire back through some of the beads near where you attached the first loop. This will help keep everything secure and in place.
How Do You Make a Braided Bracelet Step by Step?
Assuming you would like a tutorial on how to make a basic three-strand braid bracelet:
You will need:
-3 strands of embroidery floss, cut to 18 inches each
-Scissors
-Tape
-Measuring tape or ruler
-Lighter (optional)
-Beads (optional)
Step 1: Line up the three strands of floss.
Tape the end of the floss down to a hard surface, leaving about 2 inches of excess tape at the end. This excess tape will be used later to secure the bracelet.
Step 2: Begin braiding the strands together.
To do this, take the strand on the far right and cross it over the middle strand. Then, take the strand on the far left and cross it over the new middle strand. Continue crossing alternate outer strands over the middle until you reach desired length.
The further you go down each strand,the more tightly woven your braid will be. Step 3: Once you have reached your desired length, measure out about 2 inches of excess floss and cut off any remaining string after that point. Step 4: Take this excess string and tie it in a knot around all three strands, as close to where they emerge from the braid as possible.
You may want to go over this first knot a few times to make sure it is extra secure before trimming off any excess string that remains. Step 5: Next, use your lighter to carefully singe/melt the ends of all four strings(this step is optional). Doing so helps prevent fraying and ensures that your bracelet will last longer overall. Finally, slide any beads onto bracelet (again, optional) and enjoy!
How Do You Make a 5 Strand Braid Bracelet?
Assuming you would like a tutorial on how to make a 5 strand braid bracelet:
You will need:
-5 colors of string/embroidery floss (you can use more or less depending on how wide you want your bracelet to be)
-scissors
-tape
-a pencil or pen
-a ruler or measuring tape
Instructions:
1. Measure out and cut five pieces of string/floss that are each about 2 feet long.
If you want your bracelet to be longer or shorter, adjust the length of your strings accordingly. You can also use fewer or more strands, but five is a good place to start if this is your first time braiding with multiple strands.
2. Tie the five strands together at one end, leaving about an inch of slack.
Then tape the loose end of the bundle down to a hard surface like a table so it doesn’t move around while you work.
3. Separate the strands so they fan out evenly, then braid them together using whichever plait you prefer (French, Dutch, fishtail etc.) until you get close to the end of the bracelet. The closer you get to the end, the tighter your braid will become so take care not to pull too tightly on the outermost strings as you work.
4. When there’s about 6 inches of unbraided string left, tie all the ends together in a secure knot and trim off any excess thread so that only ½ an inch or so is sticking out beyond the knot itself. Congrats – you’ve just made yourself a beautiful new piece of jewelry!
How Do You Do a Twist Braid Bracelet?
If you’re looking for a fun and unique way to show off your personal style, a twist braid bracelet is the perfect accessory! While they may look complicated, these bracelets are actually quite easy to make. With just a few simple steps, you can create your own one-of-a-kind twist braid bracelet that is sure to turn heads.
To get started, you will need:
-Embroidery floss or other thin yarn in two colors (one for the “twist” part of the bracelet, and one for the “braid” part)
-Scissors
-Tape (optional)
First, cut three strands of each color of embroidery floss, each about 18 inches long. If you’re using thinner yarn, you may want to cut four or five strands instead.
You can also use tape to secure the ends of the floss together so they don’t come undone while you’re working with them.
Now it’s time to start braiding! Take the three strands of “twist” color floss and make a basic three-strand braid.
Once you get about halfway down the length of the floss, add in one strand of “braid” color floss to each side so that there are now five total strands. Continue braiding until you reach the end of all the floss. Secure the end with tape or a knot and trim any excess.
Your twist braid bracelet is now complete! You can wear it as is or add charms or beads to personalize it even further. With this easy tutorial, you can now make your own twist braid bracelets in any colors you like – have fun experimenting!
How to Make a Braided Bracelet in 10 Minutes? DIY Jewelry Making Tutorials
Conclusion
This blog post was very helpful in teaching how to make bracelets with beads. The author gives clear instructions and includes photos to help readers follow along. With a little practice, anyone can make these pretty bracelets.

