1. Cut a length of thread or fishing line about 18 inches long.
2. Tie a knot at one end of the thread.
3. String on a bead.
We used 6mm beads for our necklace. You can use whatever size you like. Just be sure that all of the beads are the same size.
4. String on 3 more beads after the first one. These will be your first petals.
5. String on 1 bead, then skip over 2 beads (leaving them on the thread).
This will be the center of your flower. Continue adding petals in this manner until you have added 7 petals total, or until your flowers are as large as you would like them to be. Make sure that there is an odd number of petals so that they lay evenly around the center bead!
- Begin by threading your needle with beading thread
- Then, string on a stop bead to secure the beads in place
- Next, add on as many seed beads as desired for the length of the necklace
- Once you have reached the desired length, string on another stop bead
- To create the flower shape, string on 5 petal beads and then 1 center bead
- Repeat this pattern until you have created as many flowers as desired for your necklace
- Finally, finish off by knotting the end of the beading thread and trimming any excess thread
Seed Bead Flower Tutorial
Seed beads are a type of small bead that is typically used in jewelry making and other crafts. They are usually round or tubular in shape and are available in a variety of colors and sizes. Seed bead flowers are a beautiful way to add color and interest to any project.
In this tutorial, we will show you how to create a simple seed bead flower using just a few basic materials.
You will need:
-Seed beads in your choice of colors (we used red, white, and blue)
-Beading needle
-Beading thread
-Scissors
1. Start by threading your needle with beading thread. You will need a long length of thread so that you can easily string all of your beads onto it. Tie a knot at the end of the thread to secure it.
2. Stringseed beads onto the thread until you have about 20 beads on there. These will be the petalsofyour flower, so choose whatever colors you like! Once you have your petals strung, tie them off witha knot so they don’t fall off the thread while you’re working.
3. Now it’s time to add the centerofyour flower. To do this, string on 5 more seed beads – these will be the stamensofyour flower. Once you have added all 5 stamens, tie them off with another knot so they stay in place as well
4 Finally, string on 2 more seed beads for the pistilofyour flower (the female reproductive organ).
Beaded Flower Necklace
Flower necklaces are a beautiful and unique piece of jewelry. They are often made with beads and crystals, and can be worn for any occasion. Whether you’re looking for a new necklace to wear to work or a special piece for a night out, a flower necklace is the perfect choice.
When shopping for a flower necklace, there are a few things to keep in mind. First, consider the type of beads and crystals used. Some materials may be more delicate than others, so it’s important to choose something that will withstand daily wear.
Second, think about the length of the necklace. Flower necklaces come in all different lengths, so choose one that will complement your outfit. Finally, take into account the price.
Flower necklaces can range in price depending on the materials used and the overall design.
Whether you’re looking for something simple or elaborate, there’s sure to be a flower necklace that’s perfect for you. So start shopping today and find the perfect way to add some floral flair to your wardrobe!
Beaded Flower Bracelet Tutorial
This beaded flower bracelet tutorial is a great way to learn how to make a beautiful bracelet that looks like it came from a high-end jewelry store. This particular design uses seed beads and Swarovski crystals, but you can use any type of bead you like. You will need:
-Seed beads (Size 11/0 or 8/0) in two colors
-Swarovski crystals (4mm bicones or 6mm rounds) in two colors
-Nymo thread in size D or F
-Beading needle
-Scissors
-Clasp
First, decide on the color scheme for your bracelet. For this tutorial, we will be using green and pink seed beads with clear and pink Swarovski crystals. Cut a length of Nymo thread approximately 2 feet long and thread it through your needle.
Tie a small knot at the end of the thread to secure it.
Next, string on 5 green seed beads followed by 1 clear crystal. Continue this pattern until all of the desired beads are strung on the thread.
To finish off the bracelet, string on 5 more green seed beads followed by the clasp. Tie several knots around the clasp to secure it in place and then trim off any excess thread. Your new bracelet is now complete!
How to Make Flower Bracelet With String
Making a flower bracelet with string is a fun and easy project that you can do at home. You’ll need some basic supplies, including:
-Scissors
-String or yarn
-A selection of beads (optional)
-A button (optional)
First, cut a length of string or yarn that will fit comfortably around your wrist. Then, thread on whatever beads you’d like to use. If you’re using a button, make sure to thread it on last.
Once all of your beads are in place, tie the ends of the string together to secure them. Trim any excess string and enjoy your new bracelet!
Bead Flower Tutorial
Making bead flowers is a fun and easy way to add a personal touch to your jewelry. You can make them as simple or as detailed as you like, and they make great gifts for friends and family. In this tutorial, we’ll show you how to make a basic bead flower using just a few supplies.
You’ll need:
-Beads (we used 6mm rounds in this example)
-Headpins
-Wire cutters
-Round nose pliers
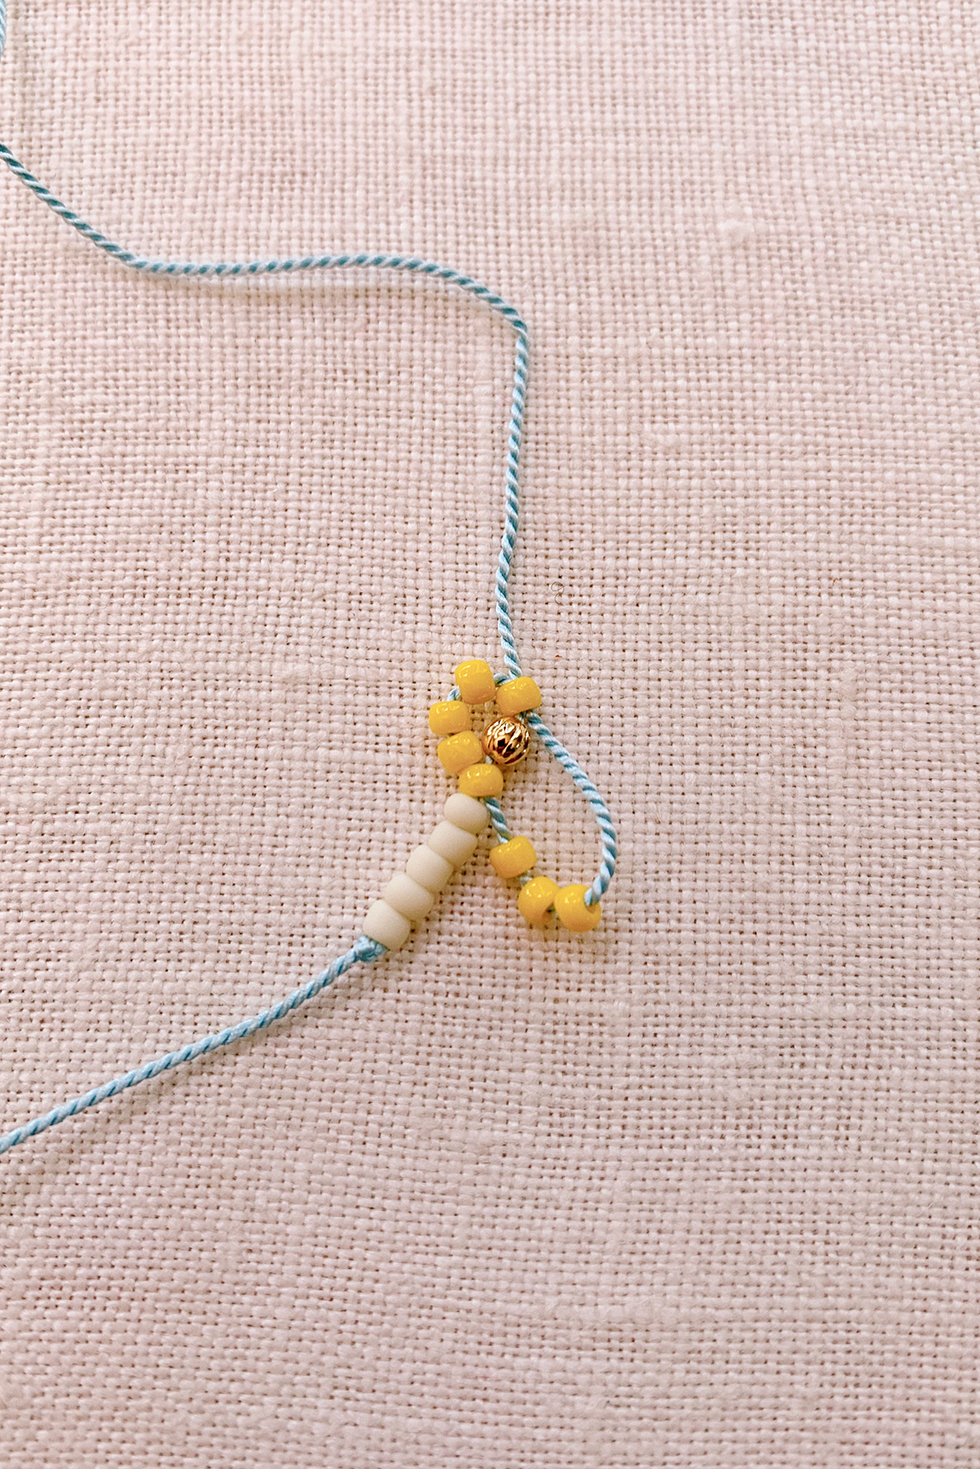
1. Start by threading 3 beads onto a headpin.
Make sure the beads are facing the same direction.
2. Using your wire cutters, trim the headpin so that there is about 1/4″ of wire remaining.
3. Using your round nose pliers, grasp the end of the wire and wrap it around the pliers to form a loop.
4. Repeat steps 1-3 two more times so that you have three sets of three beads each.
5. Take one set of beads and thread it through the loop of another set, making sure the beads are facing outwards (away from each other).
!
Credit: honestlywtf.com
How Do You Make Flower Jewelry With Beads?
Making flower jewelry with beads is a fun and easy way to add a personal touch to your jewelry collection. There are many different ways to make flower jewelry, but one of the most popular methods is using seed beads. Seed beads are small, round beads that come in a variety of colors and sizes.
You can find seed beads at most craft stores or online.
To make flower jewelry with seed beads, you will need:
-Seed Beads (in the color/s of your choice)
-Wire Cutters
-Needle Nose Pliers
-Headpins or Eyepins
-Jump Rings
Instructions:
1) Begin by cutting a length of wire that is about 18 inches long.
2) String on around 30 seed beads onto the wire. It doesn’t have to be an exact number, just make sure all the bead fit comfortably on the wire with some extra room to spare.
3) Once all the beads are on the wire, carefully slide them all down so they’re bunched together at one end of the wire.
4) Using your needle nose pliers, grasp the very end of the wire and begin wrapping it around itself until it forms a tight coil. This will keep your beads from falling off while you’re working with them.
5) Next, take one bead and thread it onto an eyepin or headpin.
Trim any excess wire, leaving about 1/4 inch before making a loop at the top using your needle nose pliers.
6) Repeat steps 5 & 6 until all your beads are turned into charms/pendants.
7) To finish up, open up each jump ring using your needle nose pliers and attach it to both ends of each charm/pendant.$ Then close up each jump ring securely.$ Your flower jewelry is now complete!
How Do You Make a Flower Bead Step by Step?
If you want to make a flower bead, the first step is to gather your materials. You will need a glass bead, some wire, and some beads in complementary colors. You will also need wire cutters and needle nose pliers.
Once you have all of your materials gathered, the next step is to thread the wire through the glass bead. This will be the center of your flower. Next, take one of your complementary beads and thread it onto the wire.
Continue adding beads until you have made a petal shape that you are happy with. Once you have made all of your petals, gently bend them upwards so that they resemble a real flower. Finally, use your needle nose pliers to twist the end of the wire so that it secures everything in place.
Your flower bead is now complete!
How to Make a Daisy Chain With Beads?
A daisy chain is a beautiful and delicate piece of jewelry that can be made with just a few supplies. You will need:
-Beads (I used 6mm glass beads)
-Wire (I used 26 gauge sterling silver wire)
-Wire cutters
-Needle nose pliers (optional)
Start by threading your wire through one bead. Then, add a second bead and thread the wire through it in the same direction. Continue adding beads until you have reached your desired length.
To finish, make a loop with the wire and then trim off any excess with your wire cutters. If needed, use your needle nose pliers to help form a neat loop. And that’s it!
You’ve now made a pretty daisy chain bracelet or necklace.
How Do You Thread a Flower With Beads?
If you’re looking to add a little extra flair to your flower arrangements, threading beads onto the stems is a great way to do it! Here’s a step-by-step guide on how to get the look:
1. Start by cutting a length of beading wire that will be long enough to reach from the top of the stem all the way down to the bottom.
2. Next, string on your beads, making sure to leave enough space at the end of the wire so that you can wrap it around the stem and secure it in place.
3. Once all of your beads are in place, gently twist the wire around the stem until it’s securely in place. Trim off any excess wire and voila!
You’ve now got a beautiful bead-adorned flower!
How to make a DAISY CHAIN flower bracelet | Easy beaded 90s jewelry DIY
Conclusion
This blog post shows how to make a flower necklace with beads. It is a simple and easy process that anyone can do. The results are beautiful and unique.

