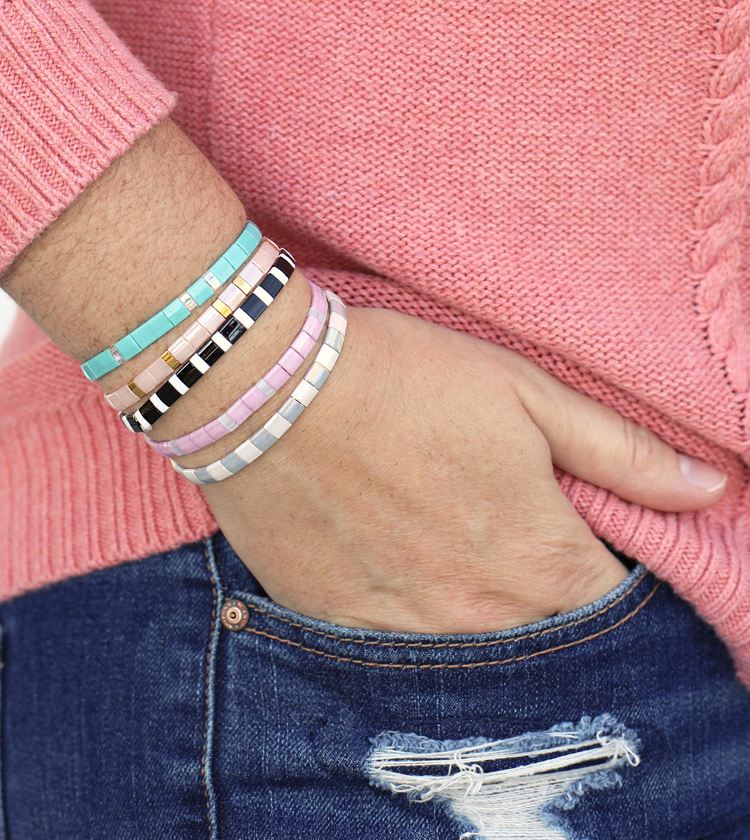
Making glass beaded bracelets is a fun and easy way to show your personality and style. You can use different colors and sizes of beads to create unique designs. To make a bracelet, you will need:
-Glass beads in various colors and sizes
-Elastic cord or string
-Scissors
-A needle (optional)
1. Cut a piece of elastic cord or string that is long enough to fit around your wrist with some extra room.
2. String the beads onto the cord/string in the pattern of your choice.
3. Once all the beads are on, tie the ends of the cord/string together to secure them in place.
4. Trim any excess cord/string from the ends.
5. If desired, use a needle to thread a small bead onto each end of the bracelet before tying it off, this will help keep the knots from coming undone.
- Start by threading your needle with beading thread, and tying a knot at the end
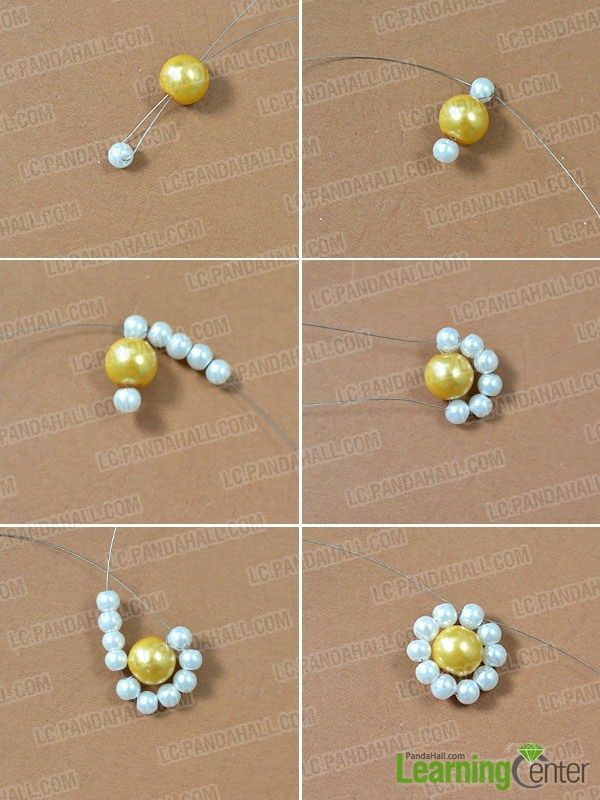
- String on your first bead, and then pass the needle back through the bead (going in the opposite direction that you came out) to create a loop
- Continue stringing beads until your bracelet is the desired length, making sure to pass the needle through each bead twice in order to secure it in place
- Once you’ve reached the end of your bracelet, tie off the thread with a knot and trim any excess
How to Make Bracelets With Beads Step by Step
Making bracelets with beads is a fun and easy craft that you can do at home. All you need are some basic supplies and a little bit of creativity. Here’s a step-by-step guide to making your own beaded bracelets.
1. Gather your supplies. You will need beads, wire, wire cutters, and pliers. You can find all of these items at your local craft store or online.
2. Cut a length of wire that is long enough to wrap around your wrist plus an extra inch or two. Use the wire cutters to snip the wire to the desired length.
3 .
Thread the beads onto the wire using pliers if necessary. Get creative with your bead choices and patterns!
4 .
Once all of the beads are on the wire, use the pliers to twist the ends of the wire together to secure them in place. Trim any excess wire with thewire cutters if necessary .
5 .
Put on your new bracelet and enjoy!
How to Make a Bracelet With Elastic Cord
Making your own bracelets is a fun and easy way to accessorize. And what’s great about making them yourself is that you can customize them to your own taste and style. Today we’ll show you how to make a bracelet with elastic cord – it’s a super simple project that anyone can do, no matter your skill level.
Here’s what you’ll need:
– Elastic cord (we like 1/8″ wide for this project)
– Scissors
– Lighter or matches (for sealing the ends of the cord)
– Beads (optional)
Instructions:
1. Cut a length of elastic cord that will comfortably fit around your wrist. Remember to add a little extra so that you can tie a knot at the end. Seal the end of the cord with a lighter or match, being careful not to singe the cord.
2. If using beads, string them onto the cord now. You can get creative and make patterns with different colors, or keep it simple with just one type of bead. Just make sure that your beads are small enough so that they won’t slip off the elastic when worn.
3. Once all your beads are on, tie a knot at the other end of the bracelet to secure everything in place. Trim any excess cord and seal with a lighter or match again.
And that’s it!
Your new bracelet is ready to wear!
Glass Bead Bracelets
Glass bead bracelets are a beautiful and unique accessory that can add style and personality to any outfit. They come in many different colors, shapes, and sizes, so there’s sure to be a glass bead bracelet out there that’s perfect for you.
One of the best things about glass bead bracelets is that they’re very versatile.
You can wear them with casual or formal outfits, and they look great with both day and night looks. Glass bead bracelets can also be dressed up or down depending on the occasion.
If you’re looking for a way to add some pizzazz to your wardrobe, consider investing in a few glass bead bracelets.
They’re an affordable way to add personality and style to any outfit!
How to Make Bracelets With Beads And String
Making bracelets with beads and string is a fun and easy activity that kids of all ages can enjoy. All you need are some colorful beads, some string, and a little bit of creativity. Here’s how to make bracelets with beads and string:
1. Start by threading your string through the first bead. Then, add as many or as few beads as you like onto the string.
2. Once you have the desired number of beads on your string, tie the two ends of the string together to form a bracelet.
3. That’s it! You can now wear your new bracelet or give it to a friend as a gift.
Making bracelets with beads and string is a great way to express your creativity.
So have fun and get creative with your designs!
How to Make a Beaded Bracelet With Clasp
Making a beaded bracelet with clasp is not as hard as it may seem. With some patience and practice, you can make beautiful bracelets that will be the envy of your friends. Here are some tips to help you get started:
1. Choose your beads. You can find beads at any craft store or online. There are endless possibilities when it comes to choosing beads, so take your time and pick out ones that you love.
2. Decide on a pattern. Once you have your beads, it’s time to decide on a pattern for your bracelet. You can use a simple stringing pattern or get creative with more complicated designs.
There are many resources available online or in books that can help you choose a pattern.
3. String the beads onto the wire or thread using the chosen pattern. If you’re using wire, make sure to leave enough slack so that the bracelet can be easily put on and taken off over the hand.
4 . Add the clasp. To add the clasp, simply thread one end of the wire through the other end and then twist it around to secure it in place .
Make sure the clasp is strong enough to hold all of the beads in place . 5 . Trim any excess wire and enjoy your new bracelet!

Credit: www.pinterest.com
How Do You Make Glass Bead Stretch Bracelets?
If you’re looking for a fun and easy jewelry project, try making your own stretch bracelets out of glass beads! All you need are some basic supplies and a little bit of patience to string the beads onto elastic cord. You can make bracelets in any color or style that you like, and they make great gifts for friends or family members.
Here’s what you need to get started:
Glass beads: Choose whatever size, shape, and color beads you like. If you’re using small seed beads, it will take more time to string them onto the cord but the results will be very delicate and pretty.
Elastic beading cord: This is available at most craft stores in the jewelry-making section. It’s important to use elastic cord rather than regular thread because it won’t break as easily when stretched over the wrist. A needle: You’ll need a needle with a large eye so that it can fit over the elastic cord.
Scissors: To cut the cord once your bracelet is finished.
Now that you have your supplies gathered, let’s get started! Start by cutting a length of elastic cord that will comfortably wrap around your wrist several times with some extra room to spare (you can always trim it down later if needed).
Thread your needle with about 18 inches of cord, then tie a knot at one end to keep the beads from falling off. String on your first bead, then pass the needle back through the bead again so that both ends of the cord are now going through it. Pull tight so that the bead sits close to all of the other beads (but don’t pull too tight or else the bracelet will be difficult to put on).
Continue adding beads until your bracelet is as long as you want it, then tie another knot at the end of the Cord to secure everything in place. Trim away any excess Cord, then slide your new bracelet onto your wrist and enjoy!
How Do You Make a Beaded Bracelet for Beginners?
Assuming you would like a step by step guide on how to make a bracelet with beads for beginners:
You will need the following supplies:
-Beads (amount and type of your choice)
-Stringing material (i.e. beading wire, stretchy cord, etc.)
-Wire cutters
-Crimp beads
-Clasp
Instructions:
1. Decide on the length of your bracelet.
Measure your wrist and add 1-2 inches to that measurement to allow for movement. Cut your stringing material to this length using wire cutters.
2. If you are using a clasp, attach one half of the clasp to one end of the stringing material using a crimp bead.
If you are not using a clasp, tie a knot in one end of the stringing material to create a secure starting point.
3. Begin threading beads onto the stringing material, adding as many or as few as you like until you reach the desired look for your bracelet. Leave enough room at the end of the bracelet so that you can finish it off in Step 4.
4. If you are using a clasp, attach the other half of the clasp to the end of the stringing material using another crimp bead and trim away any excess stringing material.
How Do You Finish a Beaded Bracelet Without a Clasp?
There are a few ways to finish a beaded bracelet without a clasp. One way is to thread the end of the bracelet through the first bead, then pull it tight. This will create a loop that can be slipped over your wrist.
Another way is to tie a knot in the end of the bracelet, then thread the tail of the bracelet through the beads until it comes out the other side. This will create a secure closure that won’t come undone. Finally, you can use clear nail polish or glue to adhere the last bead in place, creating a permanent closure for your bracelet.
How Do You Tie Glass Beads?
There are a few different ways to string glass beads, and the method you use will depend on the type of bead and the effect you want to achieve.
One popular way to string glass beads is with beading wire. Beading wire is a strong but flexible wire that comes in a variety of gauges (thicknesses).
The thicker the gauge, the stronger the wire. You’ll also need clasps, jump rings, and pliers.
To start, cut a length of beading wire about twice as long as you want your final piece to be.
Thread one end of the wire through a jump ring, and then add your clasp. At this point, you can either thread all of your beads onto the wire before attaching the other end of the clasp, or you can thread on each bead individually.
Once all of your beads are on, thread the other end of the beading wire through another jump ring and secure it by twisting the two wires together several times.
Trim any excess wire and tuck in any sharp ends so they don’t scratch you or catch on your clothing.
Entrepreneur Life 13. How To Make Beaded Bracelets 🧐
Conclusion
This blog post provides clear and concise instructions on how to make glass beaded bracelets. By following these steps, you can create beautiful bracelets that will add a touch of elegance to any outfit.

